Thursday, December 6, 2012

Curried Coconut Cream of Squash Soup

From the blog: 2012 Kitchen Witchin' and some amazing Coconut Cream of Squash Soup


Curried Coconut Cream of Squash Soup
 There is an art to making a divine squash soup. Some people prefer a savory version, others like it zested with sweetness and pumpkin pie spices. My version rests as a bridge in between. Of course, any kind of winter squash can be substituted such as Acorn, Butternut, Pumpkin, or Delicata. By allowing at least 2 hours for the mirepoix vegetables to simmer, a rich and fragrant broth emerges bringing beautiful complexity to this soup.Coconut cream, cardamon, madras curry powder,and a touch of thai basil flowers add sparkle to this soup rockstar. Thai Basil contributes a sweet peppery flavor to the soup along with the intoxicating fragrance all members of the basil family impart. 6-8 servings

Saute the following in 2T Coconut or Sunflower Oil:
1 stick celery, diced
1/2 red pepper, diced
2 small red beets, peeled and diced
1 small golden beet, peeled and diced
1/4 yellow onion, diced

When onions turn glossy add:
8c filtered water
3c chopped and peeled 2 inch chunks Hubbard squash, or other winter squash of choice
1 thumb sized hunk of ginger, chopped

Let everything simmer for 1-2 hours to create a rich stock. Puree in a blender, then place back into saucepan on a medium heat.

Add:
1 can Coconut Milk (15.6 oz)
1t sea salt
1t cardamon
1t madras curry powder
1t thai basil flowers dried and crushed
1-3t Tamari to taste, just enough to richen the flavor

Simmer soup 30 minutes on low. Serve with crusty bread and fresh salad. Garnish with roasted pumpkin seeds if desired. 

2012 Kitchen Witchin' and some amazing Curried Coconut Cream of Squash Soup

D
Curried Coconut Cream of Squash Soup

*Kitchen Witchin'
After a busy summer of harvesting, canning and food preserving, I am joyous to be back simply creating in the kitchen, blissfully using the fruits of the hard earned harvest. Dried cherries grace my salads. Frozen peaches blend nicely in my morning smoothies. Chopped, frozen locally grown green chile imbues breakfast, lunch and dinner (its' so good!).  Fresh,  sun-dried parsley, chives, and basil sprinkle garden love onto food favorites. The only bummer is the canned salsa and homemade pickles seem to be going way too fast! My cupboards are full of various glass mason jars of various leaves, powders, fruits, herbs and just all out earth loving goodness! I'm *kitchen witchin'  it up right now and loving it. The domestic goddess is infiltrating and seducing us. Alchemical artistry of herbs, produce, wildcrafting, and wholesome foods within the home results in a fresh take on being domestic. 

We are in an era of crazy changing times for the earth as well as for humanity. With food being our most direct connection to the Earth body, the statement "you are what you eat" is more potent than ever. I find that I crave eating my own homecooked food more and more as the world news gets weirder and wackier. With all of the collective energies of chaos, war, peace, and change that is infiltrating us energetically, why eat unbalanced toxic food energy? I have worked in the restaurant industry for 15 years on and off, and the quality and vibration of the food being produced is rarely harmonious or zen. A huge percentage of the food is coming from industrialized farms and are full of GMO's, pesticides and all that nasty stuff. Not much is made from scratch these days either. I helped a catering company this last summer that actually served prefabricated mashed potatoes that were just heated up from a plastic bag. The ingredients list had about 20 different barely pronouncable 'foods' in it. Um... gross. 

In the name of convenience, the art of cooking for others and the simplicity of nurturance has been degraded. The modern ways of food production and preparation are so detached from the earth energetic body and nature itself. The medicine inherent in all food and herbs is dissipated and non-existent within our current accepted eating mantra. Locally grown and preserved food is incredibly important to integrate into our diets. This is what will ground us and bring healing. It will help our bodies cope with the chaotic transformative vibrations that these times are riding. Medicines and tinctures of wildcrafted herbs shield the body from spiritual, physical, and environmental pollution while being tonifying and building health.

In order to surf these cosmic waves of 2012, we must become food secure within. This begins in our own kitchens and throughout our daily actions of buying and preparing food. The domestic arts are making a comeback and it is a radical form of protest to garden, gather, and harvest our own food, therefore, being self sufficient from the ridiculous corporate protocol of earth destruction. The cells of our being are under attack, yet we can choose to feed our own body's cells appropriately. We must remember: there is nothing more powerful than ourselves. The choice lies within.

During the fall and winter, it feels natural to eat healthy and wholesome, as well as  to get the body grounded and in balance again after the exertion of spring and summer. Soups, are especially nutritious. A well made soup is a powerful healing food where the various curative powers of herbs, vegetables, legumes, and grains combine synergistically and soothe the entire body through every bite and slurp. They are easily digestible and full of nuturance.

My favorite little health food store recently began featuring locally grown Hubbard squash, chopped and peeled to boot, creating much excitement for my foodie brain. There is an art to making a divine squash soup. Some people prefer a savory version, others like it zested with sweetness and pumpkin pie spices. My version rests as a bridge in between. Of course, any kind of  winter squash can be substituted such as Acorn, Butternut, Pumpkin, or Delicata.

The Art of Soup
Soup making is a very personalized art, every chef has their secrets. All of my soups begin with a variation of the mirepoix. The mirepoix is a french technique for starting the soup. It is traditionally a saute in the soup pot of carrots, onion, and celery with a light coat of oil or butter. When the onions get glossy, all of the other soup ingredients are added. The mirepoix is the prelude to the final culmination. Experimenting with the types of oil used in the saute along with switching up the traditional vegetables takes soup making to the next dimension.
I was quite pleased with how my curried coconut cream of squash soup turned out. I have tried to create a squash soup many times before, but they seemed to lack substance and depth. With this soup I allowed the mirepoix vegetables to simmer for hours with chopped hubbard squash and fresh ginger, creating a rich stock. The addition of coconut cream, cardamon, madras curry powder,and a touch of thai basil flowers added sparkle to this soup rockstar. 
Thai Basil grew beautifully in my garden this year and I dried all of the flowers for later use. They add a sweet peppery flavor to the soup along with the intoxicating fragrance all members of the basil family impart. 

*my good friend Kind Jade came up with the wonderful word/s 'kitchen witchin'. We  define it as the artistry of herbs, food, and alchemy within the kitchen that results in magick, healing, and amazing food creations. Check out her blog: www.jeweledcauldron.blogspot.com

Curried Coconut Cream of Squash Soup
Saute the following in 2T Coconut or Sunflower Oil:
1 stick celery, diced
1/2 red pepper, diced
2 small red beets, peeled and diced
1 small golden beet, peeled and diced
1/4 yellow onion, diced

When onions turn glossy add:
8c filtered water
3c chopped and peeled 2 inch chunks Hubbard squash, or other winter squash of choice
1 thumb sized hunk of ginger, chopped

Let everything simmer for 1-2 hours to create a rich stock. Puree in a blender, then place in a saucepan on medium heat.

Add:
1 can Coconut Milk (15.6 oz)
1t sea salt
1t cardamon
1t madras curry powder
1t thai basil flowers dried and crushed
1-3t Tamari to taste, just enough to richen the flavor

Simmer soup 30 minutes on low. Serve with crusty bread and fresh salad. Garnish with roasted pumpkin seeds if desired. 


Friday, September 28, 2012

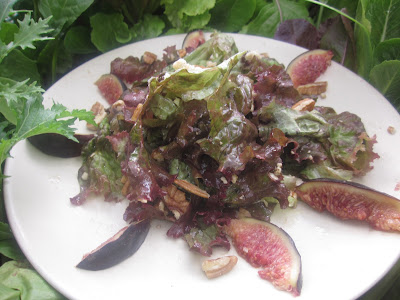
Balsamic drizzled Red Leaf Lettuce Salad with Figs, Blue Cheese, and Pecans


Balsamic Drizzled Red Leaf Lettuce Salad 
with Figs, Blue Cheese, and Pecans
Figs are an enlightened fruit. A luscious interior of soft sweetness and inherent aphrodesiac qualities combine spiritually in this long cultivated gem. The fig tree originated in the middle east and has been enjoyed as a delicacy since ancient times. Balsamic vinegar, blue cheese and pecans complement nicely in this fresh and divine salad. Serves 4-6

Toss the following in a medium bowl:
4 red leaf lettuce leaves, torn into bite size pieces
2t balsamic vinegar
4t olive oil
pinch sea salt
fresh cracked black pepper

Place the following ingredients on top of tossed salad:
1/4c pecan halves
1/4c crumbled blue cheese
2 figs, cut into fourths

Serve immediately.

Desserts

Mexican Mocha Bomb Ice Cream Cake

MEXICAN MOCHA BOMB ICE CREAM CAKE
Homemade ice cream cake: put that on your bucketlist! My young sons celebrate their birthdays in the heat of July which inspires me to create a variety of ice cream cakes for their big birthday bashes every year. I refuse to buy a prefab, funky crayola colored frosted cake for them. In the baking and cooking department, I am the all out Supermom. Getting my kids to school on time every morning is a challenge, yet making stuffed french toast for their breakfast before school is incredibly simple for me. If only the public school system would understand this! 
It amazes me how the art of birthday cake making has been replaced by big box store bakery 'cakes' in the name of convenience. If a cake is not made from scratch, I simply don't want to eat it. Dessert is a special occasion and that lies at its' very core. Indulgence and celebration deserve the real thing. 
So......I took on the challenge of making my first ice cream cake for my eldest sons' 3rd birthday. It was to be a  huge event involving my dad's side of the family, who are reknowned for their baking skills. I must admit that there is a subtle competitiveness between the ladies of this family when it comes to from scratch baking creations. The dessert table at any Gordon family holiday is simply epic! My pie crusts will probably never quite compare, but I do feel I have carved my own baking niche in our family. That said, the cake was a huge success. An ice cream cake that wasn't from a commercial ice cream shop and actually made from scratch really does blow peoples' minds. I love announcing that its' going to be served and seeing the excited reactions. Adults line up like children in anticipation.  
This is the perfect cake for a birthday party or special occasion in the heat of summer. Layers of orange and cinnamon zested chocolate mocha cake, espresso fudge, and vanilla ice cream stack deliciously together and delight children and adults alike. It is important to use locally roasted fresh brewed coffee and organic cocoa powder for the richest mocha flavor. Use all organic ingredients as they are of the highest quality while imparting the best taste. Make this cake one full day ahead so it can freeze completely before serving. Let cake thaw for 20 minutes before serving.

The cake:
1c oat flour
2c unbleached white flour
2/3 cocoa powder
2t baking soda
2c unbleached cane sugar
2t cinnamon
1c expeller pressed sunflower oil
2c strong coffee
4t vanilla
1/3 c flax seed gel*
3T apple cider vinegar
fresh zest of one organic orange

Preheat oven to 350 degrees. Grease and flour 3 9inch round cake pans. Then line them with parchment paper. In large bowl, combine flours, cocoa powder, baking soda, cane sugar, and cinnamon. In medium sized bowl, whisk together all the other ingredients except vinegar. Add wet ingredients to dry and whisk till fully incorporated. Add vinegar and combine thoroughly. Evenly distribute batter between pans and bake for 25-30 minutes. Cakes are done when the edges begin to come off of the cake pan sides and when cake bounces back after a finger is lightly pressed in center of cake. While cakes are cooling, make the espresso fudge.

Espresso Fudge:
2c Ghirardelli semisweet chocolate chips
1-2 shots espresso

Melt chocolate chips in a thick-bottomed small saucepan or double boiler. Whisk frequently to avoid burning. Add enough espresso so chocolate has a spreadable consistency. While fudge is still warm begin cake assembly.

Cake Assembly:
fresh whipped cream, recipe follows
1 quart vanilla bean ice cream, softened (Breyers’ brand works great)
3 cooled cakes
1 recipe espresso fudge, warm and spreadable (reheat if needed)

To make whipped cream: Beat on high with electric mixer 1 pint organic heavy whipping cream and ¼ cup unbleached cane sugar until peaks form and mixture is thick and able to spread like a frosting. Don’t beat too long or it will turn into butter! It helps to whip cream in a cold metal bowl. Keep whipped cream in refrigerator until ready to use in cake assembly.

1. Take one cake out of pan and place on a large flat plate. Spread half of espresso fudge onto cake evenly.
2. After fudge cools down, spread 2 cups softened ice cream on top of fudge layer on cake. Soften ice cream just enough so its’ spreadable. Melted ice cream will not work. Be careful that is doesn’t drip over sides. Use hands if needed to get ice cream to spread evenly. Warning: this step is messy!
3. Place another cake on top of ice cream fudge layer and then spread the rest of espresso fudge over it. Immediately put cake in freezer so the fudge can cool down before adding the next layer of ice cream.
4. When fudge has cooled, take cake out of freezer for the final cake assembly steps. 5. Spread 2 cups of softened ice cream over fudge on the second cake layer and then add last cake layer on top.
6. The final step is to thickly spread the fresh whipped cream on cake sides and top.
7. Place cake in freezer and let it freeze for a full 24 hours.

Cake will slice easily with a sharp Chef’s knife when it is serving time. Let cake thaw a full 20 minutes before slicing. One can run knife under hot water if having trouble slicing cake.


Real Deal Bruschetta

Real Deal Bruschetta with Fresh Mozzarella and Red Wine Balsamic Drizzle
I made the mistake of ordering Bruschetta the other night at a local cafe. Lifeless, under ripe tomatoes and dried basil (not fresh?!) sat upon over dry bread that the cafe called crostini. "This is not what Bruschetta looks like!"- I screamed in my head. You should've known better, I told myself, as most restaurants make this esteemed dish with the same tomatoes McDonalds' uses on their dollar menu hamburgers.
Bruschetta is only as good as the tomatoes used. Farmers' Market fresh and Heirloom ripened are top choice for this recipe. Adding love and fragrance, abundant basil is a key ingredient as well. Fresh mozzarella over lightly toasted artisan sourdough is the perfect pillow for ripe tomato amore. The drizzle of a red wine balsamic vinagrette is the esteemed final touch. Silence is bound to insue after the first few delectable bites. The simplest ingredients at their seasonal and most flavorful moment is what creates Bruschetta that leaves one speechless. Now this is what Bruschetta looks like!

Bruschetta Topping
combine the following in a small bowl:
1 1/2c chopped, vine ripened tomatoes
10 fresh basil leaves, chopped
4 fresh rosemary leaves, minced
opt. a few leaves each of fresh thyme and oregano

Red Wine Balsamic Drizzle
whisk the following in a small bowl:
1T balsamic vinegar
1T red wine, preferably old and oxygenated
2 cloves garlic, finely minced
1/2t agave nectar
2T olive oil
pinch sea salt
fresh cracked black pepper

To assemble:
4-6 slices artisan bread of choice (sourdough works great)
4 oz mozzarella thinly sliced

1. Toast both sides of bread slices lightly
2. Drizzle lightly with red wine balsamic vinagrette
3. Place 2 slices of mozzarella on each bread slice
4. Place bread in oven at 375 degrees and take out when cheese is just melted
5. Arrange on plates and put bruschetta on each bread slice. Drizzle with with red wine balsamic vinagrette to finish. 
6. Serve and eat immediately


Herbed Fresh Garden Tomato Sauce


Herbed Fresh Garden Tomato Sauce
Red, ripe and juicy tomatoes take the center stage in this sauce. Only heirloom or farmers' market fresh tomatoes should be used in this recipe as its' strength rests in the divine and natural sweetness of a fresh picked and vine ripened tomato. Sauce is just lightly simmered so the flavors stay bright and full of life. Olive oil can be substituted for butter to make a dairy free version. Serve over fried squash blossoms, eggplant parmesan, or ravioli. 

In small, thick bottomed saucepan saute the following:
2T butter or olive oil
2cloves of garlic
2c chopped ripe, fresh garden tomatoes (heirloom varieties preferable)
2t agave nectar
7 leaves fresh rosemary, minced
4 leaves fresh basil, minced
1T chives, minced
sea salt and fresh cracked pepper to taste

Simmer on low for 10 minutes, just enough time for the flavors to combine. Take off heat until serving time.


Beer Battered Squash Blossoms with Herbed Garden Tomato Sauce


Beer Battered Ricotta Basil Stuffed Squash Blossoms with Herbed Garden Tomato  Sauce

I honestly can't decide what I like more, the actually zuchini itself or its' succulent blossoms. Squash blossoms are incredibly divine, and outright orgasmic. Yes, warning: eating these tempura beer battered squash blossoms could possibly be a tastefully pleasurable experience. When the first blossoms appear on my squash plants, my mouth begins to salivate and I head to liquor store immediately to purchase a Corona or Tecate bomber for my beer batter tempura. For about a week straight, I make this dish daily. Its all out indulgence until, well, somethings' gotta give!  One can't eat fried food everyday, so eventually I have to force myself off the squash blossom bender. This recipe is officially my favorite creation out of my garden. Its' that good.
        Sweet ripe heirloom tomatoes cooked with garden fresh herbs make the perfect sauce and only fresh garden tomatoes are allowed to be served. These battered delectables would be incredibly offended if grocery store GMO 'tomato' grossness was put onto their plate. They are regal and they deserve only the garden fresh best. Any type of squash blossoms work fine for stuffing. Larger Pumpkin blossoms are my favorite shining with their own unique flavor.


The steps in preparation: 
1. Gently fill flowers with ricotta basil filling using a pastry bag
2. Dip and coat filled squash blossoms in batter 
3. Place in hot oil and fry till golden brown
4. Let cool slightly on paper towels


Ricotta Basil Filling
mix together the following ingredients in a small bowl:
1 1/2c Ricotta cheese
7 fresh basil leaves, minced
1/4t fresh grated nutmeg
fresh cracked pepper to taste

Tempura Beer Batter
whisk the following together in a small bowl:
3/4c unbleached, white flour
1/2c non GMO cornstarch
1t baking soda
6oz mexican lager beer (i.e. corona or tecate)
1t apple cider vinegar
pinch of sea salt
fresh cracked black pepper

Herbed Garden Tomato Sauce
in small, thick bottomed saucepan saute the following:
2T butter
2cloves of garlic
2c chopped ripe, fresh garden tomatoes (heirloom varieties preferable)
2t agave nectar
7 leaves fresh rosemary, minced
4 leaves fresh basil, minced
1T chives, minced
sea salt and fresh cracked pepper to taste

Simmer on low for 10 minutes, just enough time for the flavors to combine. Take off heat until serving time.

To assemble and finish:
12 squash blossoms 
1-2 cups safflower, virgin palm oil, or virgin coconut oil

Put Ricotta Basil filling in a pastry bag fitted with a large tip. Gently fill each blossom using pastry bag. Twist ends of blossom to enclose filling. Heat 1 cup of oil to start in a small iron skillet. Alternatively, use a fry daddy and fill with oil as needed. Dip blossoms, one at a time, in batter, coat thoroughly and then place in hot oil. Fry 4-5 blossoms at a time, turning them over once. When lightly browned, they are done. Add more oil to skillet as needed. Place onto paper towels to drain off excess oil. When all blossoms are done, serve with herbed garden tomato sauce.


Wednesday, July 4, 2012

Summertime Spring Rolls


SUMMERTIME SPRING ROLLS
Fresh spring rolls, are the perfect food to eat as the mercury climbs towards 100 degrees. So fresh and versatile, almost any vegetable when sliced right can be featured in these rice paper wrapped miracles. The art lies in creating a distinct contrast of crunch and texture while incorporating a variety of  vegetables and salad greens. The dipping sauce is just as important as the spring roll. You really can't have one without the other. Their compatibility enhances the spring roll eating experience. 
        The following Spring Roll recipe features Jicama- a crisp, slightly sweet and watery root vegetable that is kind of similar to the potato. However, Jicama is best enjoyed in its' raw form and is actually related to the Rhubarb family. It is popular in Mexico and grows prolifically in the central regions there.  
        The first thing to do when making spring rolls is relax. Rushed hands rip and tear the delicate rice paper wrappers. Patience, along with a zen state of mind are key to successful spring roll wrapping. Begin by prepping all of the vegetables, greens, and tofu. Then clean off a large counter space where the soaked rice papers will be placed. So get your cutting board, veggies, and large bowl of cold water ready! Let's make amazing summertime fresh spring rolls.

prepped salad greens and vegetables

Delicate rice papers only need to soak for 2-3 minutes in cold water. Only place
4 papers in water at a time. Papers are ready when they are slightly pliable and feel "al dente".  They will soak up more water after being placed on countertop. Oversoaked papers will result in spring rolls that fall apart and tear easily.

Gently pulling bottom paper edge over filling and then tucking in around filling with fingers.

Place soaked rice papers gently onto a clean countertop, carefully spreading them out. Place 6-10 at a time in production line fashion. This is an effective way to make many spring rolls in an efficient manner. Place small amount of each ingredient in center of each wrapper. Pull bottom edge of wrapper around filling, while condensing filling within wrapper to make a tighter package. Use fingers to do this while rolling wrapping edge over.

Fold in the wrapper sides to further wrap the spring roll filling.

Roll tightly, yet gently the rest of the rice paper to form a cylindrical spring roll.

Summertime Spring Rolls
makes 16 rolls

8c spring or mesclun salad greens
2c arugula leaves
3 sm. avocados or 2 lg.
1/2 sm. jicama, peeled
3 carrots, peeled
1/2 red pepper
1/2 package firm tofu
2 T tamari
18-20 rice paper wrappers, have more on hand just in case some tear or break

To prepare Tofu:
Cut into 4-5 1/2 inch thick slices. Bring an iron skillet or other thick bottomed, nonstick skillet to medium heat and add coconut oil. When oil is hot place tofu rectangles in skillet. Crisp each side for about 3 minutes and then place on paper towels to drain excess oil. After all tofu is done mix with tamari in small bowl, so the tamari marinates it. Let marinate at least ten minutes and then slice each square into 2-3 strips.

To prepare vegetables and greens:
Mix together spring mix greens and arugula in small bowl and set aside. Open all avocados and remove pits. Slice flesh lengthwise, about 8-10 slices per half. Do a julienne style (or 'shoestring') cut with jicama, carrots, and red pepper. 

To prepare spring rolls:
Fill a large bowl of cold water for soaking rice papers ready. Arrange spring roll making area, placing salad greens, julienned vegetables, and tofu in easy to reach zone. Begin by soaking 4 papers at a time and then placing onto countertop. Once countertop is full of papers, equally distribute a handful of salad green mix, 3 carrot strips, 3 jicama strips, 2 red pepper strips,  2-3 avocado slices, and about 1 1/2 to 2 strips of marinated tofu. Arrange carrots and jicama close to the center, as they can easily poke out and puncture the rice paper during rolling process. Follow wrapping instructions as guided above through pictures.